Zero Fundamentals: Build Advanced Routes
In this guide, you'll build advanced routes by exploring some of the route settings available in Pomerium Zero.
Make sure you’ve completed the following guides:
Each tutorial builds on the same configuration files. In this tutorial, you’ll build new routes with some of Pomerium’s route-level settings.
What are advanced routes?
Pomerium provides many route-level settings that allow you to customize how the Proxy service handles requests. More advanced configurations allow identity header pass-through, path and prefix rewrites, and request and response header modifications.
In the Zero Console, these settings are organized into categories, like TLS Settings and Headers settings. For the purposes of this guide, we will test only select settings from the categories listed below:
- Headers
- Path Matching
- Path Rewriting
- Advanced settings
Set up HTTPBin
To test these settings, we will configure Pomerium Zero and Docker Compose to host an HTTPBin server. If you’re not familiar with HTTPBin, it’s a call-and-response HTTP server you can use to test (you guessed it) HTTP requests and responses.
Add the httpbin service to your Docker Compose file:
httpbin:
  image: kennethreitz/httpbin
  networks:
    main: {}
  ports:
    - 80:80
Add the httpbin route:
- Create a new route
- Add From and To URLs
- For Policies, select
Any Authenticated User
Save your route and apply your changeset.
Test Headers settings
Pass identity headers (per route)
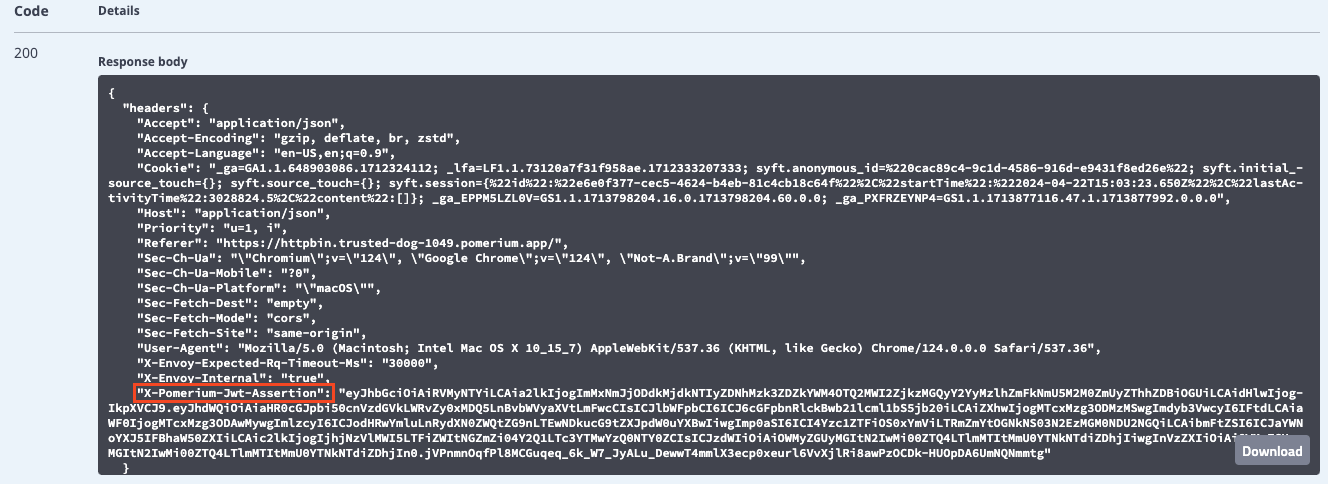
Pass Identity Headers is a route-level setting that forwards the user's JWT to the upstream application in a signed HTTP header. The HTTP header must use the (case insensitive) x-pomerium-jwt-assertion format. You configured this setting in the previous guide, but let's see how it looks as a request header.
In the Zero Console:
- Edit your HTTPBin route
- Select Headers
- Apply the Pass Identity Headers setting
- Save your route and apply the changeset
Access the HTTPBin route and send a request. To send a request, on the HTTPBin page:
- Open the Request inspection dropdown menu
- In GET /headers, select Try it out
- Select Execute to send the request
In the Response body field, you'll see the JWT assertion header:
Read the following documentation to learn more about identity verification in Pomerium:
We also provide SDKs for JWT verification in the following languages:
JWT Claim Headers
The pass identity headers setting can also forward unsigned identity headers as additional JWT Claim Headers.
To add JWT claim headers in Pomerium Zero:
-
Select the Settings tab in the main sidebar
-
In Editing Cluster Settings, select Headers
-
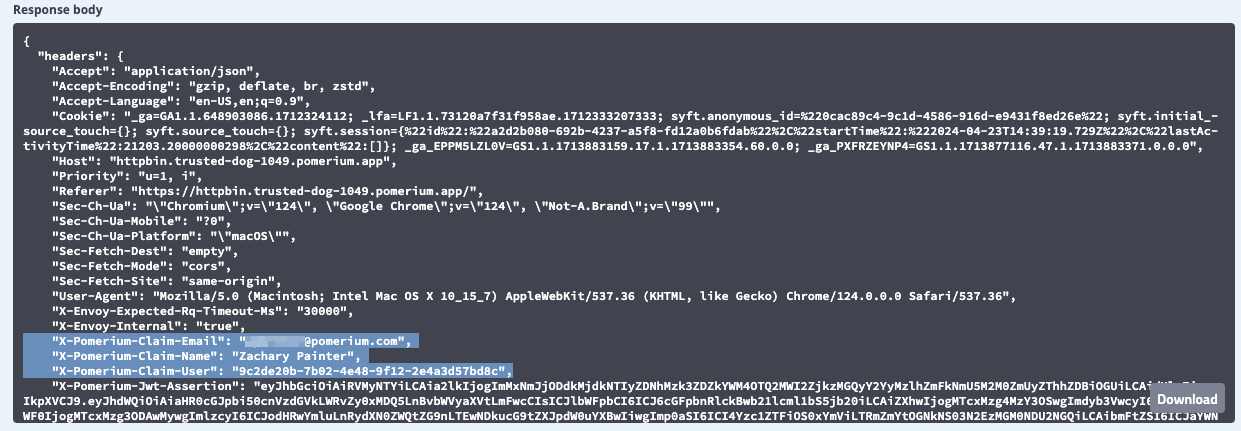
In the JWT Claim Headers field, enter the values below:
KEY VALUE x-pomerium-claim-emailemailx-pomerium-claim-useruserx-pomerium-claim-namenameFor example:

After you save your changes, apply your changeset, and access your HTTPBin route, inspect the request. You'll see these additional, unsigned HTTP headers added to the response body:
Set and remove request headers
Now, configure Set Request Headers to add static custom HTTP headers to your request:
-
Go back to the HTTPBin headers settings
-
In Property Name, enter
X-SET-REQUEST-HEADERS -
In Property Value, enter
X-TEST-VALUENext, configure Remove Request Headers to remove two of the JWT claim headers you set in the previous section.
-
In the Remove Request Headers field, enter
X-POMERIUM-CLAIM-NAMEandX-POMERIUM-CLAIM-USER.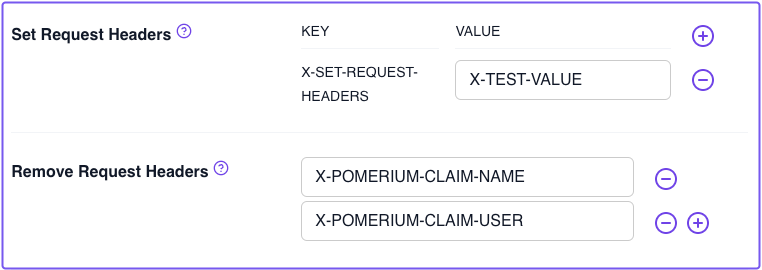
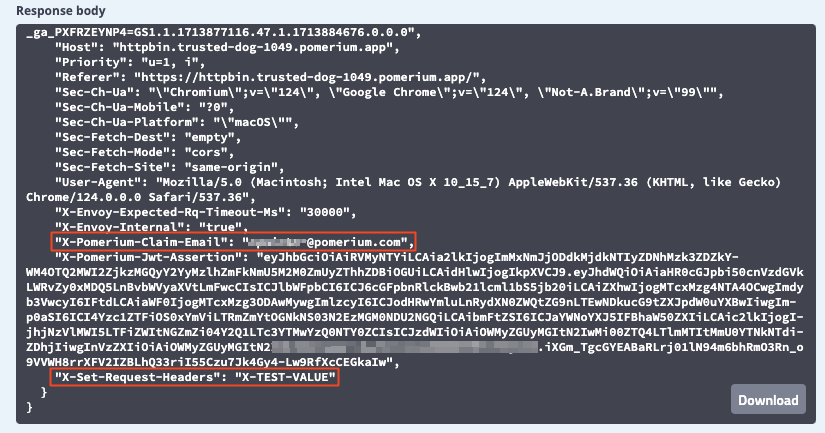
Apply your changeset and test the request again. You'll notice that the request header was added to the request, and the specified JWT claim headers were removed:
Rewrite Host header to a literal value
You may need to modify the value of the Host header. For example, some servers may only accept Host headers with a value that matches the Origin of the request. The Host Rewrite setting allows you to modify the Host header in the HTTP request to a literal value.
If you don't tamper with this setting, the value of the Host header will be the hostname of our upstream service: "Host": "httpbin".
Now, go back to the Headers tab for the HTTPBin route. In the Host Rewrite to Literal field, enter your HTTPBin route.
For example, httpbin.righteous-gemstone-1734.pomerium.app

After applying your changeset, check the request headers in HTTPBin again. You'll notice Pomerium rewrites the Host header to the domain you entered in the Zero Console:
"Host": "httpbin.righteous-gemstone-1734.pomerium.app"
Test Advanced settings
Redirects
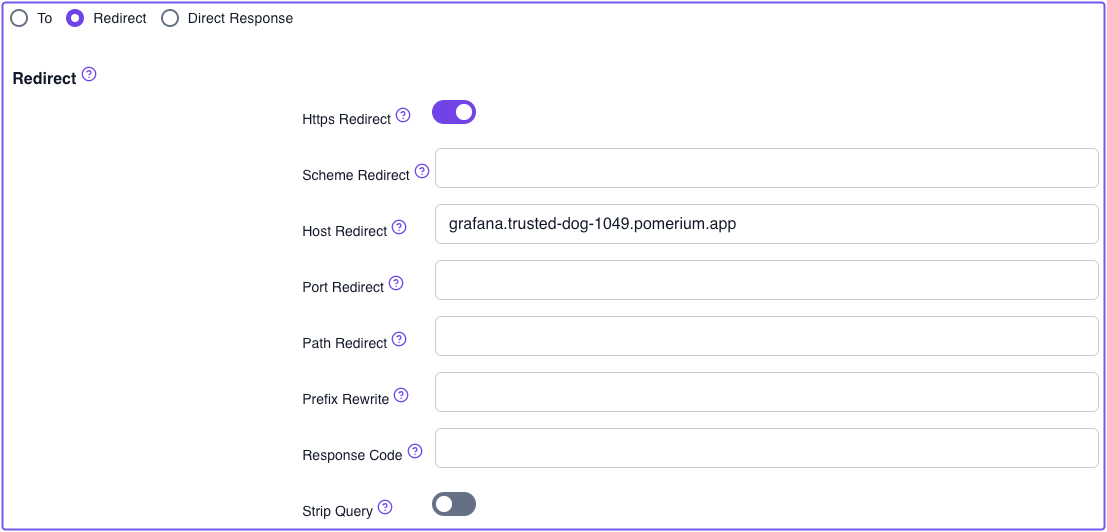
Configuring a Redirect instructs Pomerium to send the request to a different URL.
To configure a redirect:
-
Go to your HTTPBin route and select Advanced, Redirect
-
Turn on HTTPS Redirect
-
In the Host Redirect field, enter a URL you want to redirect requests to, and remove the scheme
For example:
After you save your route changes, you'll notice in the General tab that the To URL has been removed.
If you access your route in the browser, you'll notice it redirects you to the specified URL:
![]()
Direct Response
You can configure Pomerium to send a small, static HTTP response to the downstream client for a managed route.
To configure a Direct Response:
- Select a route
- Select Advanced, Direct Response
- In Status, enter an HTTP response status code like
200(this field only accepts numerical values) - In Body, enter some example text, like "This is a test response."
After you save your route changes, you'll notice in the General tab that the To URL has been removed.
Now, navigate to the URL. Pomerium should send back a 200 OK response with the example text.
Test prefix and path settings
Configure Node server
To demonstrate these settings, you need to add a simple Node HTTP server to your Docker Compose file.
First, make sure you install Node.js.
After you've installed Node.js:
- Create a new directory called
appandcdinto it - Initiate a Node application:
npm init - Create an
index.jsfile:touch index.js - Install Express:
npm i express
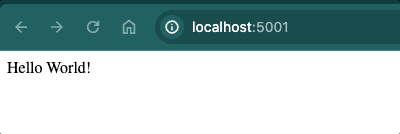
Add the following code inside index.js:
const express = require('express');
const app = express();

app.get('/', (req, res) => {
  res.send('Hello World!');
});

app.get('/admin', (req, res) => {
  res.send('This is an admin only page');
});

app.listen(5001, () => console.log('Server is up and running'));
This mini server builds two different endpoints:
//admin
Your app directory should now have a package.json file and a node_modules folder.
Next, test your server:
node index.js
Navigate to localhost:5001 to see if your server serves the Hello World! message. Similarly, if you go to localhost:5001/admin, you should see This is an admin only page.
Dockerize Node server
Next, we will Dockerize our Node server. In the ./app directory, create the following files:
touch Dockerfile && touch .dockerignore
In Dockerfile, add the following instructions:
# pull the Node.js Docker image
FROM node:alpine

# create the directory inside the container
WORKDIR /usr/src/app

# copy the package.json files from local machine to the workdir in container
COPY package*.json ./

# run npm install in our local machine
RUN npm install

# copy the generated modules and all other files to the container
COPY . .

# our app is running on port 5001 within the container, so we need to expose it
EXPOSE 5001

# the command that starts our app
CMD ["node", "index.js"]
In .dockerignore, add:
node_modules npm-debug.log
In Docker Compose, add your Node server:
nodeserver:
  networks:
    main: {}
  build:
    context: ./app
  ports:
    - 5001:5001
In Pomerium Zero, add a route and point it to nodeserver. For example:
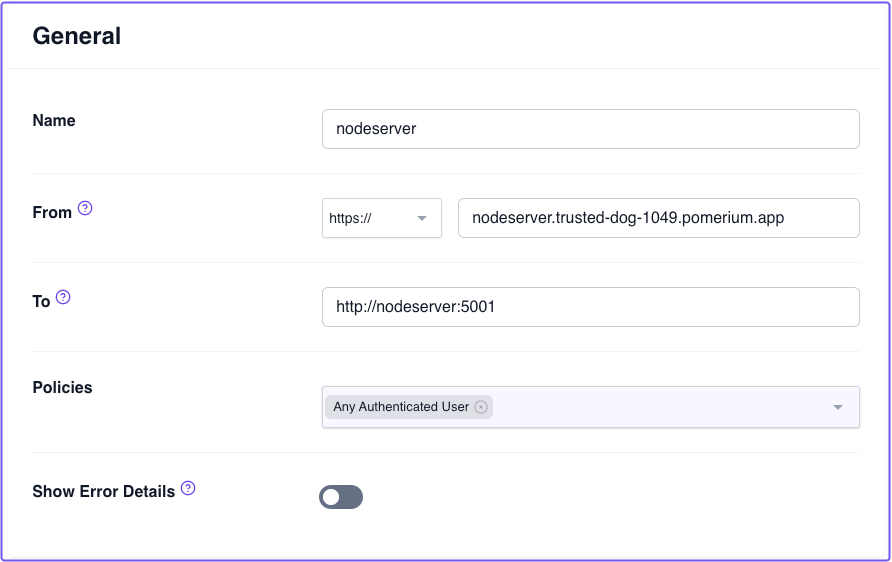
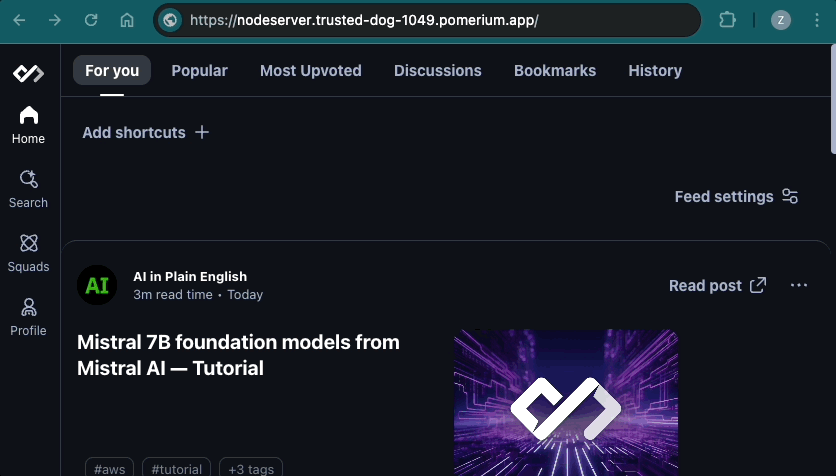
Save your changes and apply your changeset. Then, test your route.
Path Matching: Prefix
Assuming your route works, we will configure the Prefix setting.
The prefix setting instructs Pomerium to only match the route if the incoming request has the specified prefix in its path.
In the Zero Console:
- Go to your Node server route
- Select Path Matching
- In the Prefix field, enter
/admin
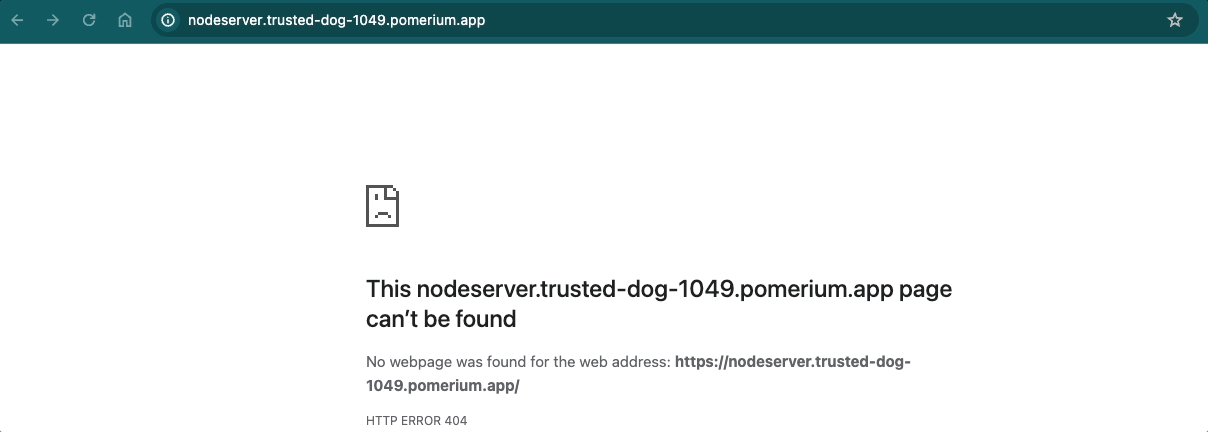
If you append the /admin endpoint to your route, Pomerium should direct you to the /admin only page. If you don't append /admin, you will see a 404 error:
Path Rewriting: Prefix Rewrite
Next, let’s add Prefix Rewrite.
In the Zero Console:
- Select Path Rewriting
- In the Prefix Rewrite field, enter a
/
If the incoming request’s prefix matches the value of prefix (/admin), Pomerium will rewrite prefix to match the value of prefix_rewrite.
Now, if you navigate to the /admin endpoint, Pomerium will redirect you to the / page. If you don’t include the /admin prefix, the request will 404.
Great job! You've configured several advanced routes in Pomerium Zero.
Up Next: TCP Routes
In the next guide, you'll secure TCP routes and access an SSH service.
Go to TCP Routes.
Configuration file state
At this point, your Docker Compose file should look like:
services:
  pomerium:
    image: pomerium/pomerium:v0.27.2
    ports:
      - 443:443
    restart: always
    environment:
      POMERIUM_ZERO_TOKEN: <CLUSTER_TOKEN>
      XDG_CACHE_HOME: /var/cache
    volumes:
      - pomerium-cache:/var/cache
    networks:
      main:
        aliases:
          - verify.<CLUSTER_SUBDOMAIN>.pomerium.app
          - authenticate.<CLUSTER_SUBDOMAIN>.pomerium.app
  verify:
    image: cr.pomerium.com/pomerium/verify:latest
    networks:
      main:
        aliases:
          - verify
  grafana:
    image: grafana/grafana:latest
    ports:
      - 3000:3000
    networks:
      main: {}
    environment:
      - GF_AUTH_SIGNOUT_REDIRECT_URL=https://grafana.<CLUSTER_SUBDOMAIN>.pomerium.app/.pomerium/sign_out
      - GF_AUTH_JWT_ENABLED=true
      - GF_AUTH_JWT_HEADER_NAME=X-Pomerium-Jwt-Assertion
      - GF_AUTH_JWT_EMAIL_CLAIM=email
      - GF_AUTH_JWT_USERNAME_CLAIM=sub
      - GF_AUTH_JWT_JWK_SET_URL=https://authenticate.<CLUSTER_SUBDOMAIN>.pomerium.app/.well-known/pomerium/jwks.json
      - GF_AUTH_JWT_CACHE_TTL=60m
      - GF_AUTH_JWT_AUTO_SIGN_UP=true
    volumes:
      - ./grafana-storage:/var/lib/grafana

  httpbin:
    networks:
      main: {}
    image: kennethreitz/httpbin
    ports:
      - 80:80

  nodeserver:
    networks:
      main: {}
    build:
      context: ./app
    ports:
      - 5001:5001

networks:
  main: {}

volumes:
  pomerium-cache: